如何为预订添加费用
当您需要向客人收取额外费用时,例如押金、清洁费、延期费、水电费或其他与预订相关的款项,可以使用收费方式。
打开“添加费用”对话框
- 打开预订详情页面。
- 前往
费用部分。 - 点击
+充电或者+ 添加. - 这
加价模态框打开。
填写费用详情
请填写必填字段:
收费名称:显示给您和客人的名称。数量:应收取的金额。货币:遵循预订。类别:此项收费的收入类别。付款频率一次性、每月、每周或自定义。支付账户一个或多个可以接收付款的账户。笔记:根据其出现的位置,可以是可选的内部上下文或面向访客的上下文。
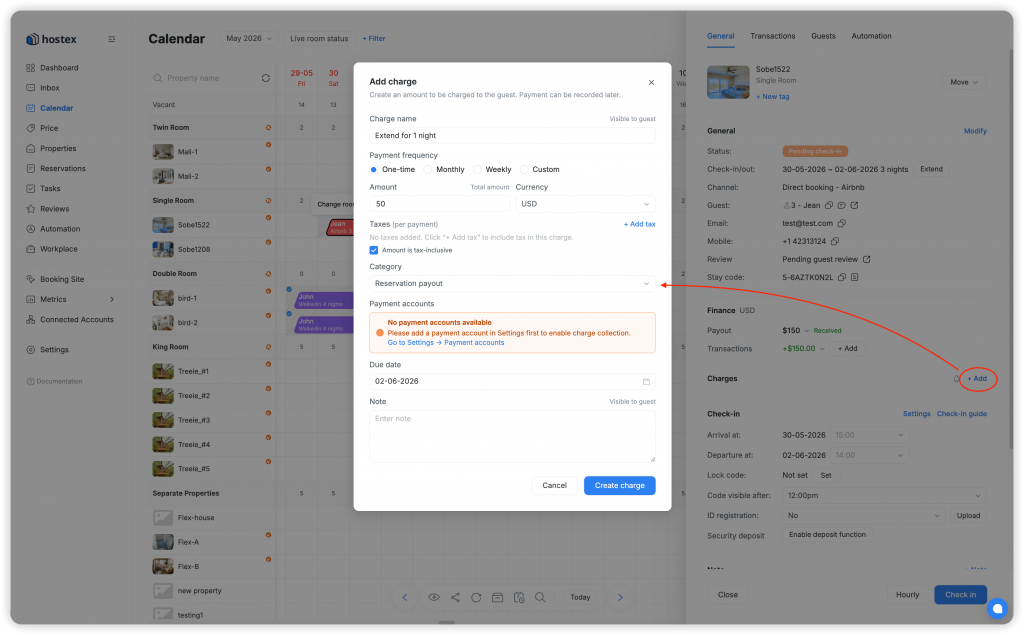
配置税费
如果需要缴税:
- 点击
另加税. - 请输入税号。
- 请输入税率。
- 选择金额是否包含税款。
如果 金额已含税。 如果选中,则输入的金额已包含税费。如果未选中,则税费将在费用金额的基础上另行收取。
税务设置会被记住,下次创建收费项目时可以预先填写。
选择支付账户
如果只有一个合适的支付账户,Hostex 可以自动选择它。
如果存在多个合适的账户,Hostex 默认选择最近创建的合适账户。您可以在保存前更改选择。
节省费用
- 请查看收费详情。
- 点击
加价. - Hostex 会创建收费并显示确认信息。
费用按创建时间排序,最新费用排在最前面。
充电状态
费用或费用实例可以显示:
未收到尚未收到付款。部分的部分款项已收到。已收到已全额支付。过量的已付金额大于收费金额。逾期到期日已过,但费用尚未全额支付。
对于定期收费,每次收费都有自己的到期日、状态、交易和发票。
收取或记录付款
使用 收集 发送付款链接或手动记录付款。
可用的收款方式包括:
- 复制邮件。
- 通过支持的预订渠道发送消息。
- 电子邮件。
- 短信。
- WhatsApp。
- 记录付款。
当客人在线支付时,Hostex 会自动创建并将收入交易与该笔费用关联起来。当您使用 记录付款Hostex 打开一个交易表单,并将创建的收入交易与费用关联起来。